| Feature | Low-Quality Editor | High-Quality Editor | | :--- | :--- | :--- | | Backup Creation | Never | Automatic .bak files | | DLC Support | Crashes on Trunks DLC | Full DLC flagging | | Community Board | Breaks friendship levels | Granular emblem adjustment | | Update Frequency | Abandoned | Updated within 48hrs of game patch | | Virus Scans | 3/60 flags | 0/60 flags (Verified) |
Dragon Ball Z: Kakarot revitalized the classic anime saga by blending action-RPG combat with an open-world retelling of Goku’s journey. While the game offers hours of training, side-questing, and meal preparation, many players eventually hit a wall: the grind. Whether it’s farming Z-Orbs to max out the skill tree, grinding D Medals for the Training Board, or replaying story segments to re-experience specific battles, the gameplay loop can become repetitive.
This is where a high-quality save editor for Dragon Ball Z: Kakarot becomes a game-changer.
But not all save editors are created equal. Low-quality editors can corrupt your data, fail to apply mods correctly, or simply offer superficial changes. In this guide, we will explore what constitutes a high-quality save editor, the core features you need, and how to safely modify your game to achieve the ultimate Dragon Ball experience.
Dragon Ball Z: Kakarot is a single-player game. Bandai Namco does not use anti-cheat software (like EAC or Denuvo Anti-Cheat) on Kakarot. Therefore, using a save editor is 100% safe from bans. However, you will invalidate your ability to upload leaderboard scores for the Horde mode (if you care about that), but for 99% of players, this is irrelevant.
Absolutely—if used responsibly.
For the player who has already beaten the main story and wants to experience Trunks’ DLC without re-grinding, or for the parent who only has an hour a week to play and wants to see the final battles, a high-quality save editor is a game-changer.
The key is to stick to community-vetted tools, always back up your data, and avoid ridiculous numbers that break the game’s internal logic. When you find that perfect, polished editor, you’re not just cheating—you’re customizing your own Dragon Ball experience.
Pro Tip: Search for “Kakarot Save Editor GitHub” or visit the Nexus Mods Dragon Ball Z: Kakarot section to find the most recent, high-quality tools recommended by the modding community today.
Have you used a save editor in DBZ: Kakarot? Share your experience and which tool you trust below!
For players looking to customize their experience in Dragon Ball Z: Kakarot
, several high-quality save editors and asset tools are available as of April 2026. These tools allow you to bypass the grind by maximizing resources, unlocking all skills, or even modifying core game files for custom content. Top Save Editors for DBZ: Kakarot
Depending on your platform, different tools offer varying levels of "quality" and features: Save Wizard (PS4/PS5) : A premier paid service for console players that supports Dragon Ball Z: Kakarot . It features automated "Quick Codes" to maximize Zeni rapid level-ups , and unlock full resource inventories. Asset Editor by kaiheilos (PC) : Primarily hosted on Nexus Mods
, this tool is the "high-quality" choice for deep customization. It allows you to extract game .pak files and modify DataTables like DT_SkillTree to change skill requirements or ItemTableHeal to edit health items. Dragon Ball Z: Kakarot Mod Manager (PC)
: While not a direct "editor" of save values, this tool provides a high-quality interface for managing mods that change game behavior. It simplifies the process of adding or removing files without manually moving them into game directories. Key Save Editing Features
Most high-quality editors or pre-made 100% save files offer the following enhancements: Resource Maxing
: Instant access to Max Zeni, D Medals, and rare cooking ingredients. Character Completion
: Unlocking all Super Attacks, transformations (including DLC content), and maxing out all Soul Emblems. Quality of Life
: Accessing the "HD Update" features, such as improved environment textures and faster loading times, which may require specific save data transfers between versions. Installation & Safety Guide
To use a save editor safely without losing progress, follow these standard steps: save editor dragon ball z kakarot high quality
Here is the text:
Save Editor for Dragon Ball Z: Kakarot - High Quality
Are you looking for a reliable save editor for Dragon Ball Z: Kakarot? Look no further! Our save editor is designed to provide high-quality editing features that will enhance your gaming experience.
Key Features:
What can you edit?
Why choose our save editor?
Download now and enhance your Dragon Ball Z: Kakarot experience!
Title: A Must-Have Tool for the Ultimate Custom Experience – 5/5 Stars
Review:
If you’ve already beaten Dragon Ball Z: Kakarot once or just want to skip the grind on a second playthrough, this save editor is an absolute game-changer. The interface is clean, intuitive, and surprisingly high-quality for a fan tool—no clunky layouts or confusing options. You can easily tweak everything from Zeni and D Medals to community board levels, character stats, and even unlock all skills/transformations instantly.
What really impressed me was the stability: no crashes, no corrupted saves (as long as you follow the simple backup prompt), and it works flawlessly across both the main game and DLCs. The ability to max out your character’s level or unlock all Super Attacks without hours of repetitive grinding respects your time while letting you enjoy the story at your own pace.
Whether you’re a veteran looking to experiment with maxed-out builds or a busy player who just wants to feel like a true Super Saiyan from the start, this editor delivers. Highly recommended—just don’t overdo it or you might rob yourself of the challenge!
Pros:
Cons:
Verdict: An essential, high-quality tool for Kakarot fans who value flexibility and efficiency. 10/10.
Finding a high-quality save editor for Dragon Ball Z: Kakarot
depends primarily on your platform. While "all-in-one" save editors for this specific title are rarer than for games like Xenoverse 2
, there are several highly-regarded tools and methods that provide the same results. 1. The Best Editor by Platform For PC (Windows):
WeMod is widely considered the highest-quality option for PC players. It isn't a traditional "offline" save editor but a real-time trainer that lets you modify your save data while the game is running. You can instantly give yourself max Zeni, Orbs, and D Medals, which remain in your save file after you close the app. For PS4/PS5: Save Wizard for PS4 MAX This is the gold standard for console editing. It supports
(CUSA14655) and allows you to apply "Quick Cheats" to your save files, such as maxing out Zeni, Orbs, and gift items, or even instantly hitting Level 250. It also features an "Advanced Mode" for users who want to manually edit hex values. Cross-Platform (Browser-Based): Save Editor Online A generic but powerful tool that can analyze and edit files. You upload your | Feature | Low-Quality Editor | High-Quality Editor
file, and it breaks down the variables (like character levels or item counts) into an editable list. 2. High-Quality Features to Look For
A "high-quality" editor should offer more than just infinite health. Look for these specific capabilities: Resource Management:
Ability to max out Zeni, D Medals, and various colored Z-Orbs. Character Progression:
Features to unlock all Super Attacks, Transformations, and max out Soul Emblems. Item Unlocking:
Instant access to all cooking ingredients, gift items, and development materials. Safety Features:
Tools that allow you to back up your original save before applying changes to prevent corrupted data. 3. Quick Write-Up: How to Use a Save Editor Safely Back Up Your Save: Locate your save folder (typically in Steam/userdata/[YourID]/851850/ for PC) and copy the files to a safe location. Close the Game:
Never edit a save while the game is actively running, as this can cause sync errors or crashes. Apply Changes: Load your file into the editor (like Save Editor Online ) or use a tool like Save Wizard Verify & Test:
Launch the game and check your inventory. If you notice bugs—like levels exceeding the intended cap—revert to your backup. instead of editing your own? AI responses may include mistakes. Learn more Save Editor
For Dragon Ball Z: Kakarot , save editing and management tools vary significantly by platform. While PC users have access to trainers and hex-editing tools, console users (specifically PS4) generally rely on third-party services like Save Wizard. PC Save Editors & Trainers
PC players have the most flexibility, with options ranging from real-time trainers to downloadable modded save files.
WeMod Trainer: Provides a high-quality interface to edit Zeni, D Medals, and Z Orbs of all types. It also features multipliers for orbs and infinite recovery items.
Nexus Mods: Offers pre-made "high-quality" save files, such as the Full Save File Modded, which includes maxed resources and completed sub-stories across all DLCs.
Hex Editing (Manual): Advanced users can use hex editors to modify the AT 164 shipping.exe for specific engine-level changes, such as removing ultrawide black bars or adjusting FOV. Console Save Editing (PS4/PS5)
Console save editing is more restricted and often requires external hardware or paid software.
Save Wizard for PS4: This tool allows users to apply cheats to PS4 save data.
Features: Max Zeni and max Z Orbs for manual and auto-saves.
Advanced Mode: Allows users to manually add custom cheats or community-contributed codes.
Cross-Gen Transfer: Note that saves can be transferred from PS4/Xbox One to PS5/Xbox Series X|S versions natively. However, once migrated to a next-gen version, standard PS4 save editors will no longer work on the new file format. Best Practices & Safety
Modifying save data carries risks, including file corruption or loss of progress. Have you used a save editor in DBZ: Kakarot
For a high-quality experience, users typically rely on established mod managers and premium editors rather than standalone scripts.
Save Wizard for PS4/PS5: A premium tool that offers "high-quality" cheats for the console version. It provides reliable mods for:
Max Zeni and Max Orbs (requires at least one of each to trigger). Rapid level-ups and skill unlocks. Advanced mode for importing custom community cheats.
Kakarot Mod Manager: The preferred high-quality choice for PC players to manage save-altering mods. It simplifies adding/removing .pak files without corrupting core game files.
Asset Editor by Kai Helios: Often recommended in modding communities like Nexus Mods for deeper save and asset customization. High-Quality Save Files (Premade)
If you prefer not to edit files yourself, downloading a "Complete" or "Ultimate" save file from reputable sites is a popular alternative:
Nexus Mods hosts "Completed Save Files" with all sub-stories, main stories, and training trials finished.
Gry-Online offers an "Ultimate Save" pack that includes high-level characters and maxed resources. Essential Quality-of-Life Tips
Backup First: Before using any editor, always create a copy of your SystemSave0 and ManualSave files. On PC, these are typically in Steam\userdata\.
Corrupted Save Fix: If an edited save shows as "corrupted" on the load screen, it is often still loadable. Load the file, then manually save over it to "un-corrupt" the data.
Cloud Sync: Disable Steam Cloud or console auto-sync before applying edits to prevent the game from overwriting your changes with older cloud data. Technical Compatibility Xbox One/Series Save Editing Fully supported (Editors/Mods) Supported via Save Wizard Very Limited Premade Saves High availability on Nexus Mods Account-locked (Difficult) Not typically possible Cross-Gen PS4 to PS5 Transferable Xbox One to Series Transferable If you'd like, I can help you:
You're referring to the Save Editor for Dragon Ball Z: Kakarot!
For those who may not know, a Save Editor is a tool that allows users to modify their game save files, enabling them to change various aspects of their game progress, such as character stats, items, and more.
Regarding the "high quality" aspect, I'm assuming you're looking for a Save Editor that can handle high-quality or detailed edits, possibly including:
Some popular Save Editors for Dragon Ball Z: Kakarot that support high-quality edits include:
When using a Save Editor, please ensure you:
This editor configuration focuses on "High Quality" edits—meaning clean values that won't crash your game and preserve your progression integrity.
Unlike generic "Max Everything" scripts that can glitch your game progression (preventing you from unlocking certain achievements or trophies), this method focuses on clean edits. We modify values within the game's logic limits so you can continue playing DLCs (like Bardock - Alone Against Fate or The 23rd World Tournament) without crashes.
Pro Tip: Use the editor to give yourself "Royal Tomato" and "Pikahan" meat to cook the best meals in the game for massive permanent HP and Attack boosts!
Enjoy the post! Let me know in the comments if you need help locating specific values or if the tool isn't reading your save file.
Valid from EWA version 2.21.228.0
Created for Daimler AG
4 Startup of EWA Administration Tool
5 Starting, Stopping and Monitoring of EWA core services
6 EPC / WIS Database Maintenance
6.1 Starting and stopping the installed Databases
6.3 Enter StartKeys for EPC/WIS
7 Advanced Command line options
7.2 Update (Database and Software)
This document describes the EWA AdminTool Interface of EWA which is used to update, manage and maintain the WIS and EPC Databases as well as managing the state of the server.
Besides the software installation, the applications need to have access to certain databases for content data. This content is not installed within the setup of the software but needs to be updated after installation. The aim of this behavior is to decouple software and data update and minimize the downtime of the applications.
This document describes the use and function of the EWA AdminTool. The following use cases are documented in this description:
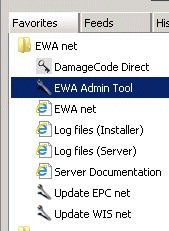
The EWA Administration tool can be started using the favorites menu inside the Internet Explorer. This entry is created during installation and is only available on the server.
Picture 1: Start of EWA Administration tool using the favorites menu
The EWA Administration tool can be only started on the EWA server. If the link to this tool is not available, it can be started manually using the command
[EWA_HOME]\ewa_admin\EWAAdmin.exe
where EWA_HOME need to be replaced with the directory where EWA was installed.
With the EWA Administration Tool it is possible to influence the availability of the server and see if it is running. The Administration tool acts as a service monitor and shows if the needed Windows services are running or not.
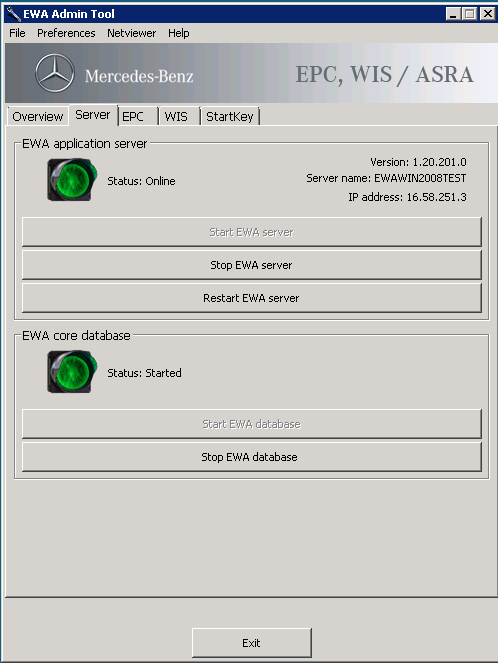
Picture 2: Service Monitor Page for the Server
Within this panel the EWA server (application server) can be started and stopped. This is more or less a shortcut for the Windows "Services" view.
Also within this panel the user management database (i.e. for specific user data, FIN Cache,…) can be started and stopped.
Note:
Database "start" and "stop" is not simply starting and stopping services. A "stop" always also stops the corresponding TransBase multiplexer service. And "start" always starts both the database engine and the TransBase multiplexer service.
If the services are stopped the application server will not be available for all users. Please take this into account when starting or stopping services.
It is possible to see the current state of the running database on the EPC / WIS net Screen in the Administration Tool. If no database is installed, the traffic light will be off. If the database itself is working and the database service shows a good status, it will show a green traffic light. Else the traffic light will show a red status.
Use the "Start" and "Stop" Buttons to shutdown / start the database and the Transbase service.
Note:
Database "start" and "stop" is not simply starting and stopping services. A "stop" always also stops the corresponding TransBase multiplexer service. And "start" always starts both the database engine and the TransBase multiplexer service.
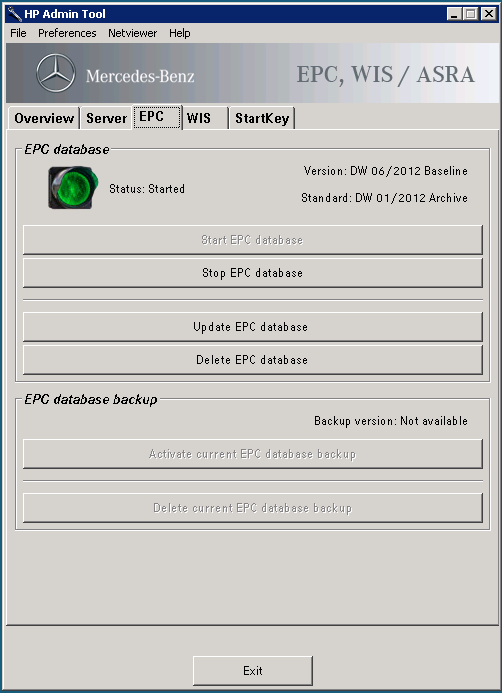
Picture 3: EPC Administration of Database
Note:
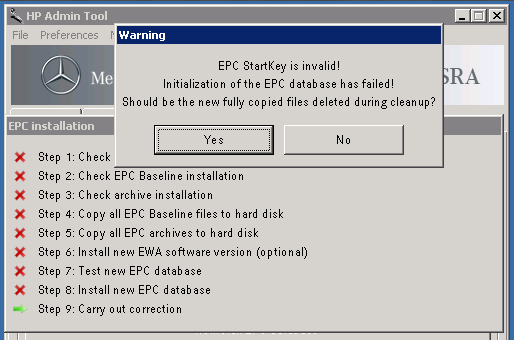
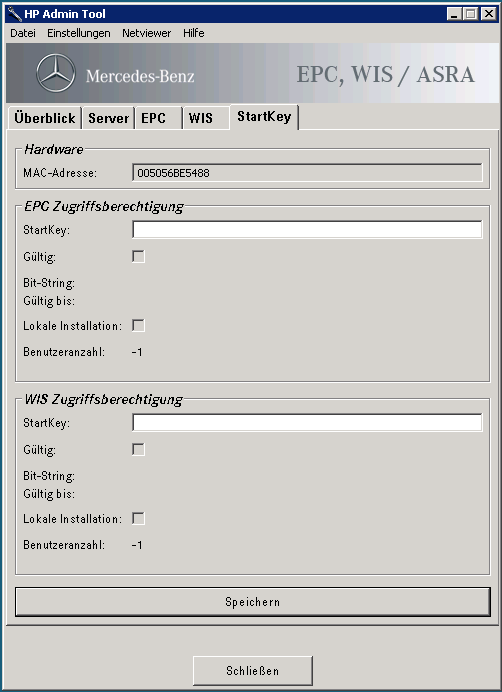
EPC / WIS database installation requires a valid StartKey. The section Enter StartKeys for EPC/WIS shows how to enter a StartKey.
To install a new database into the running application, use the "Install" button. This will start the process of copying the needed database files from DVD to hard disk and attach the databases to the running service. Once a database is installed, the button will be labeled as "Update" to indicate that this action will update the running database.
Note:
It is also possible to enter a valid StartKey using the administrative interface of the EWA web interface. To open the EWA web interface use the shortcut "EWA net" from your Favorites "EWA net" folder or directly open the URL http://localhost:9000/EWA-net. An explanation for entering StartKeys is provided in the HP User Management Administration Guide.
On the tab "StartKey" it is possible to enter a StartKey for EPC and WIS.
Initial installation using "archive" and "base" media
EPC requires base and archive DVDs. The archive DVD contains a set of older valid data cards. This archive media is normally published once every year and all subsequent monthly base publications are based on it. The base DVD contains newer data and relies on the data from the archive DVD.
The installation process is quite simple: The user starts the AdminTool, navigates to the EPC tab and clicks on the button "Install EPC database". The user will be prompted to insert the first update DVD of the base DVD set. Subsequently it is required to insert all archive media DVDs. After performing these DVD checks, the DVDs needs to be insert consecutively, beginning with the first update DVD of the base DVD set again in order to start copying of all files and attaching them to a new database. Afterwards the installation process finishes.
Initially inserting an archive medium instead of a base medium will lead to an error message.
After clicking the button "Install EPC database", an EPC data DVD needs to be insert. For EPC the AdminTool will try to read the "FDARequest.cfg" file which is normally in the folder "MBXX\cfg" of any data DVD.
Picture 4: AdminTool requests the data DVD configuration file
If the DVD is inserted just press "OK" - the Tool will search all available drives in PC for the configuration file. If you already had a valid data DVD of EPC in one of your DVD drives, the tool will have skipped this dialog and started installation immediately.
Note:
If the files should be installed using a network share, use the "Browse…" button and navigate to the corresponding folder on the network share and select the "FDARequest.cfg"/"WISCD000" file in the folder "MBXX\cfg"/"wis" relative from the DVD root.
The Tool will also search all hard drives and mounted Shares for data DVDs.
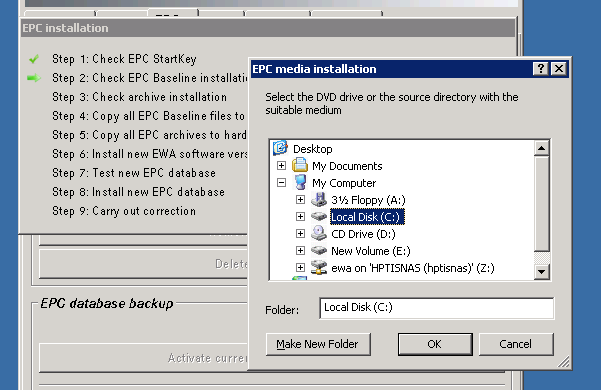
After the configuration file has been read successfully and the database files could be found, the tool will request to select a target drive for the database content. Select a drive where all database files should be copied to and click "OK".
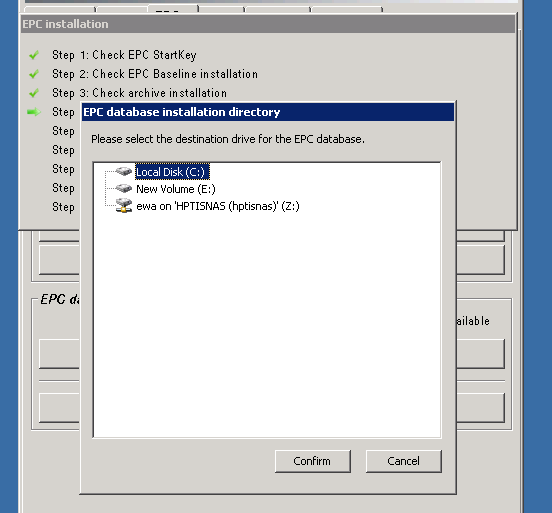
Picture 5: Selection of the target drive for database content
The next step in the copy process is to start to copy the ROM files to hard disk. If the source DVD can not be located in any drive of the PC, the Tool will ask for a source for copying the files.

Picture 6: Selection of ROM file source
In this dialog, please select the DVD root directory when the tool requests a file. The path inside the media is searched automatically. If a network share is used as file source, please point to the folder which corresponds to the original DVD root.
The copy process will be visualized with a progress. Please wait until all data has been copied or the Tool asks you for further media.
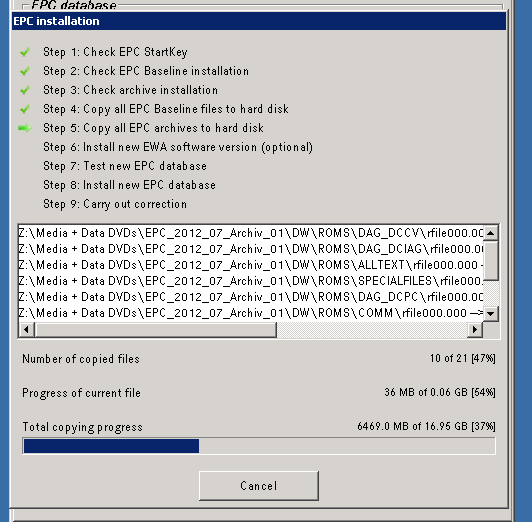
Picture 7: Copy Progress Dialog
After all database ROM files have been copied, the tool will proceed with the following steps:
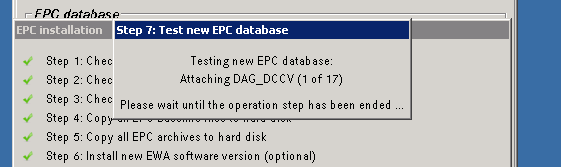
Picture 8: Database test Dialog
After these steps have been completed successfully, it will show a notification that all needed databases have been copied and activated successfully. The traffic light for the EPC / WIS database status will turn to green now.
Picture 9: Successful installation of a database
Initial installation using full version
WIS full version requires 2 DVDs. DVD 1 contains the software, the monthly published ROM files and the lucene index files. DVD 2 contains the remaining ROM files. The WIS full version media is usually published every quarter year. Based on the latest full version DVDs monthly update DVD publications are published. The update DVD has the same structure as DVD 1 of the full version.
The WIS installation process is similar to the EPC installation process. Lucene index files will be copied after all database ROM files have been copied. wis_cfg.xml will be customized to use the lucene index.
The update of database content will almost use the same installation process like the initial installation of the database.
The difference in the update step is that you are requested to insert the DVD which contains the setup into any DVD drive. During update the normal setup will be called to update software resources. Please select the appropriate folder where the setup.exe is available if the files could not be found automatically.
Note:
When updating the server, you should ensure that no user is using the applications. Users can continue working while database ROM files are being copied to the hard disk. But after finish of this process the server will be shutdown so users might lose important data.
Database can easily be deleted from the system by clicking on the "Delete" button. This button will delete the currently active database.
Note:
Be sure that you notify all users to save important data and to log off from the system as they might loose data when the database will be deleted.
When a database set was updated, the older version will be kept as backup database. With the activate database button it is possible to switch the backup and the active database. The former active database will be kept as backup.
Note:
Be sure that you notify all users to save important data and to log off from the system as they might loose data when switching the database.
This chapter is mainly intended for System Integrators who want to make use of the batch mode of the AdminTool to allow further customizing of the installation update process, one may want to make use of the command line features of the EWA AdminTool.
Note:
EWA AdminTool has been developed for the "local" environment where all software components will be installed on one single server. In a distributed environment like the "central" not all of the features described here will work.
To get an overview of the available options, just issue the following command on a command line:
"C:\Program Files\EWA net\ewa_admin\EWAAdmin" /?
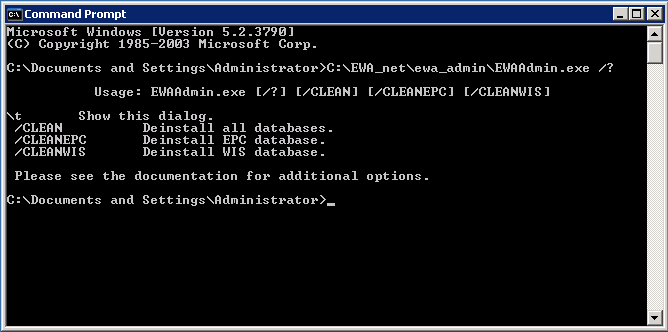
Picture 18: Help to get Usage Hints for EWA Administration Tool
This overview will not capture all options. Further options will be available here in the documentation
AdminTool allows starting and shutting down the Transbase databases individually without the need of knowledge about the special characteristics behind it. There are currently 3 databases that can be controlled:
The command line is quite easy. You specify which database you want to operate on and which operation you would like to perform: shutdown or boot. The command line for this is:
EWAAdmin.exe [/core | /wis | /epc] [/boot | /shutdown]
Description:
|
Parameter |
Description |
|---|---|
| /core |
Operate on the EWA user management database |
| /wis |
Operate on the WIS database |
| /epc |
Operate on the EPC database |
| /boot |
Boot the specified database |
| /shutdown |
Shutdown the database. This will also invalidate any open connection without reconfirmation. |
Example call:
EWAAdmin /wis /shutdown
will shutdown the WIS database.
Note:
When shutting down databases in most cases it may also make sense to shutdown the application server, too. After doing your maintenance be sure to boot the application server again.
There is no command line in EWAAdmin.exe as this can easily be achieved by issuing the command lines
net stop "EWA net Server"
to stop the application server or
net start "EWA net Server"
to start the application server again. This command must be issued on the server machine where the EWA application server is running of course.
If you want to start an update without the user being forced to start AdminTool and click some buttons you can easily start the update process from the command line. Simply select the application part you would like to operate on (WIS or EPC). AdminTool will then automatically start the update process for the regarding application.
The command line looks like this:
EWAAdmin.exe [/wis | /epc] [/license <Licensebits>] [/force] [/source <Path>] [/target <Drive>] [/nofork] [/noswupdate] [/unattended] [/v]
Description:
|
Parameter |
Description |
|---|---|
| /epc |
Update EPC |
| /wis |
Update WIS |
| /license <Licensebits> |
Optional: Note: You cannot provide a crypted StartKey here |
| /force |
Optional: |
| /source <Path> | Optional: Defines the source path from where to find and copy the database files. Te source parameter can be specified multiple times if multiple source directories are required. Besides the specified source paths the program always searched all available drives for the needed files if the file can not be found in the defined source path. |
| /target <Drive> |
Optional: |
|
/nospacecheck | Optional: Flag to specify whether the free space check on the target drive should be omitted. If specified, the program will not check for sufficient free space on target drive. |
| /nofork | Optional: In a normal call the program copies itself to %TEMP% and executes there. If the process should be watched, this parameter can be used to prohibit the copy of the application to %TEMP%. Note: When using this option the integrated software update will fail. In this case please call the software update manually! |
| /noswupdate | Optional: Enforces the program to skip consistency checks and does not run software update during database update.
Note: When using this option you have the possibility to skip a software update when installing new database content. Nevertheless is it highly recommended that you always update the software together with the database update. If you decide to de-couple the software and database installation processes this is fine - but do not forget to update the software, too. |
| /unattended | Optional: Suppresses confirmation dialogs and allows batch execution of the program |
| /v | Optional: Enables debug logging for troubleshooting (verbose mode) |
Note:
When specifying parameters containing special characters like "-" or "/" please quote those parameters.
Example:
Use
EWAAdmin.exe /source "C:\EWA-net"
instead of
EWAAdmin.exe /source C:\EWA-net
The latter one will fail as the commandline parser will think there is another parameter hidden on the commandline.
You can remove any installed databases from the system by the command line, too.
The command line looks like this:
EWAAdmin.exe [/clean | /cleanwis | /cleanepc]
Description:
|
Parameter |
Description |
|---|---|
| /clean |
Removes all (EPC AND WIS) databases |
| /cleanwis |
Removes the WIS database(s) |
| /cleanepc |
Removes the EPC database(s) |
When using the update database options in the Administration tool a process is executed which handles the database update. The following steps are processed during a database update:
If the update can proceed using a integrated update (when no major software changes are required) the application server will be down between Step 13 and Step 23. This downtime will be usually around 5 minutes. If the update check in step 4 detects that a longer downtime is required, the application will be unavailable from step 4 until step 23.
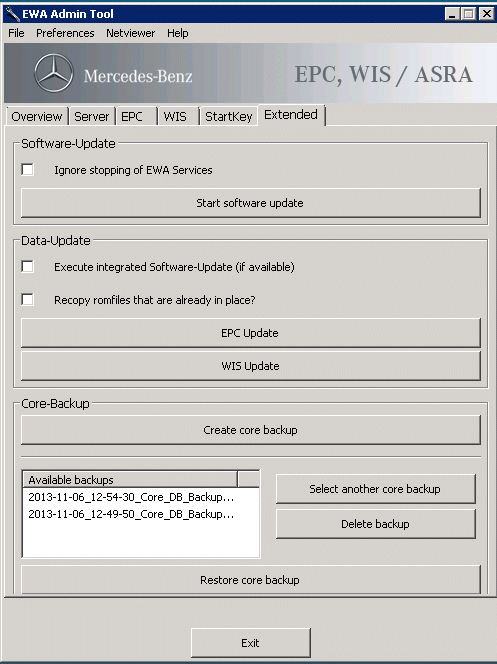
The extended mode can be used to perform EWA software updates, WIS and EPC database updates or to create or restore a user database backup.
To enable the extended navigate to the Preferences menu and choose Extended functionality
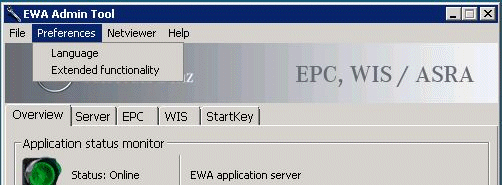
Enabling the Extended functionality implies that the Extended tab is visible.
Note:
After starting the AdminTool the Extended functionality is disabled by default.
To perform a software update only use the button Start software update. No database update will be performed. If you want to ignore unstoppable EWA Services check Ignore stopping of EWA Services.
To perform database updates for EPC or use the button EPC Update or WIS Update. No software update will be performed unless you check Execute integrated Software-Update (if available)
If you want to force to copy any existing rom file again check Recopy romfiles that are already in place?
To create a core database backup use the button Create core backup.
To restore the selected core database backup use the button Restore core backup.
If you want to choose a backup that is not shown in the list of available backups use the buttonSelect another core backup.
In order to delete a core backup from the list of available backups use the button Delete backup.
Note:
You can restore backups that have been created with one of the following EWA tools:
- AdminTool
- Backup and Migration Tool
- EWA Web interface
If the EWA Administration tool is not working, please use the following steps to determine why the application is not working: