Creative Gigaworks T3 Volume Control Replacement Work May 2026
Sync, share and collaborate on files,
on your own server, and under your control.
Live demo

Sync, share and collaborate on files,
on your own server, and under your control.
If you never adjust volume and just want sound:
Now control volume via your computer or preamp. Warning: The subwoofer will also be at 100%, so adjust your source volume carefully.
If you are reading this, you are likely the owner of a once-magnificent 2.1 speaker system—the Creative Gigaworks T3. Launched as a high-end audio solution, the T3 is famous for its powerful subwoofer, sleek design, and, unfortunately, its notoriously fragile wired volume control pod.
For years, users have reported the same gradual death: static hiss, channel dropouts (left or right speaker going silent), and a scratchy “crackle” when adjusting volume. Eventually, the pod fails completely. Since Creative no longer manufactures the T3, finding an official replacement is impossible. This forces owners into the world of Creative Gigaworks T3 volume control replacement work.
This article covers everything you need to know: Why the pod fails, how to diagnose the issue, sourcing a replacement, performing the repair yourself, and permanent alternatives to avoid this problem forever.
Title: Dead Volume Pod? How to Replace the Creative Gigaworks T3 Volume Control (DIY Fix)
Introduction The Creative Gigaworks T3 is a legendary 2.1 speaker system, but its wired desktop volume control pod is notorious for failure. Over time, the internal potentiometer wears out, causing scratchy sound, one channel cutting out, or complete loss of control. Before trashing the system, here’s how to replace the volume control unit.
Tools & Parts Needed
Step-by-Step Replacement
Step 1: Diagnose the Issue
Step 2: Find a Compatible Replacement
Step 3: Remove the Old Pod
Step 4: Install the New Pod
Step 5 (Advanced): Repair Instead of Replace
Troubleshooting After Replacement
Conclusion Replacing the Creative Gigaworks T3 volume control pod restores full functionality to this excellent speaker system. It’s a 10-minute fix for a $10-50 part. Don’t let a tiny knob kill your subwoofer!
Creative no longer makes the T3 pod, but you can find used or new-old-stock pods online.
Where to look:
Procedure:
Cost: $25–50 USD
Difficulty: 1/10 – no tools needed
The Creative Gigaworks T3 remains one of the best-sounding 2.1 systems from the late 2000s. The bass is tight, the satellites are detailed, and the design is timeless. But the volume control pod is its Achilles’ heel.
If you have basic soldering skills, Creative Gigaworks T3 volume control replacement work is a rewarding Saturday afternoon project. For $10 in parts, you can restore this system to better-than-new reliability. If you cannot solder, the cleaning trick may give you a few more months, but eventually, you will need to replace the pot.
Don’t throw your T3 away. With the guide above, you can fix it permanently and enjoy another decade of great sound.
Need help identifying your potentiometer or finding a repair shop? Leave a comment below or check out the r/Creative_Sound subreddit for community support.
Replacing the volume control on the Creative GigaWorks T3 2.1 speaker system is a common DIY repair for owners experiencing "phantom" volume jumps, scratchy audio, or unresponsive controls. Because the original control pod (or "puck") is a proprietary component often unavailable for individual purchase from Creative Worldwide Support, most successful repairs involve replacing the internal potentiometer within the pod. Essential Tools and Parts
To perform this replacement, you will need the following items commonly found at electronics retailers or through iFixit repair kits:
Replacement Potentiometer: A compatible component (often a 5-pin stereo potentiometer, though specifications can vary; verify dimensions before ordering).
Soldering Iron & Solder: Required to detach the old component and secure the new one.
Phillips #00 Screwdriver: For removing the small screws holding the plastic casing together. Super Glue: To re-secure the volume knob upon reassembly.
Cutting Pliers: Useful for snipping the pins of the old potentiometer for easier removal. Step-by-Step Replacement Guide Disassemble the Control Pod: Unplug the speakers from all power and audio sources.
Pull the knob: Firmly pull the large volume knob upward to break the factory glue and remove it.
Remove hardware: Use an adjustable wrench or pliers to unscrew the nut and washer securing the potentiometer shaft.
Open the casing: Unscrew the three small Phillips screws on the bottom to remove the plastic cover. Remove the Faulty Potentiometer: Disconnect the white internal cable from the circuit board.
Snip the legs of the old potentiometer to separate it from the board.
Use your soldering iron to heat the remaining pin fragments and remove them from the board holes. Install the New Component:
Insert the new potentiometer into the circuit board, ensuring all legs align correctly.
Solder the legs carefully, making sure no two contacts are bridged (touching).
Reconnect the internal cable and screw the plastic cover back on. Final Reassembly and Testing: Replace the washer and nut on the shaft.
Apply a few drops of super glue to the knob's center hole and press it onto the shaft.
Plug the control cable into the subwoofer and test the system before full use. Alternative Solutions
If you are not comfortable soldering, consider these alternatives:
Electronics Cleaner: For minor "scratchy" sounds, spraying a dedicated contact cleaner into the potentiometer's openings may temporarily resolve the issue.
Used Parts: Search eBay for "Creative T3 volume control" or "for parts" T3 units to salvage a working control pod.
Hardwire Bypass: Some users choose to bypass the control pod entirely by soldering wires directly to the internal amp, though this disables the pod's physical volume adjustment and requires controlling volume via your computer or phone. creative gigaworks t3 volume control replacement work
Do you need help finding the exact technical specifications for the replacement potentiometer?
Creative Gigaworks T3 2.1 Speakers Volume Control ... - iFixit
creative gigaworks t3 volume control replacement work
Step-by-step procedure
Tools & parts
Access the control pod
Identify the volume control
Test before replacing
Remove the old potentiometer
Install replacement
Verify operation
Reassemble
Troubleshooting notes
Parts sourcing tips
Estimated time & difficulty
If you want, I can:
Creative GigaWorks T3 Volume Control Replacement Guide If your Creative GigaWorks T3
2.1 speaker system is suffering from jumping volume, static, or no sound at all, the culprit is likely the Volume Control Pod
. This model is notorious for "planned obsolescence" issues where the internal potentiometer fails after a few years.
Because Creative has classified this product as End of Service Life (EOSL), official replacements are no longer manufactured. This guide details how to perform a DIY replacement or bypass. Diagnosing the Problem
Before starting a full replacement, identify the specific symptom:
Scratchy Sound/Intermittent Volume: Likely dust or oxidation on the potentiometer track. You may fix this by spraying Deoxit D5 or similar contact cleaner into the dial and rotating it vigorously.
Volume Jumps or Random Fluctuations: The internal carbon track is physically worn. A full potentiometer replacement is required.
No Power/Blue Light Off: This may be a cable issue or a blown fuse in the subwoofer amp rather than the control pod. Step-by-Step Potentiometer Replacement
Performing this repair requires a soldering iron, solder, a small Philips screwdriver, and a new potentiometer. Open the : Unplug the speakers from power and the subwoofer.
Pull the large black volume knob straight up to remove it. You may need to break a small amount of factory glue.
Unscrew the 3 small screws on the bottom to remove the plastic cover. Remove the Old Potentiometer: Disconnect the white internal cable from the circuit board.
Using cutting pliers, snip the legs of the old potentiometer to separate it from the board.
Use your soldering iron to heat and remove the remaining leg stubs. Install the New Part:
Align the new potentiometer legs with the board. You may need to bend or trim them for a flush fit.
Solder the legs firmly, ensuring no two pins are bridged (shorted). Reassembly:
Plug the cable back in, screw the housing shut, and secure the knob with a few drops of super glue or E6000 Adhesive. Alternative: Bypassing the Control Pod
If you cannot find a replacement potentiometer or the pod is physically crushed, you can bypass it entirely. This effectively sets the speaker amp to maximum volume, allowing you to control the sound level via your PC or audio source.
Method: Some users bridge specific pins on the internal PCB or modify the 9-pin mini-DIN connector to keep the system "always on" at a fixed gain.
Warning: Doing this removes the physical power switch and headphone jack functionality. Where to Find Replacement Parts Since new OEM pods are unavailable, look for these options: HyperSpin Homehttps://hyperspin-fe.com Blew up my Creative Gigaworks T3 Amp - or not? - Hyperspin
Replacing the volume control (potentiometer) on the Creative GigaWorks T3
is a common repair for issues like random volume fluctuations, scratchy audio, or erratic power cycling. Preparation & Tools
Replacement Part: A standard potentiometer of equivalent resistance and physical dimensions (check for 10k or 50k log/audio taper depending on your specific board version).
Required Tools: Soldering iron, solder, small Phillips screwdriver, cutting pliers, and super glue.
Optional: DeoxIT or a similar control cleaner if you want to try cleaning the current part before fully replacing it. Step-by-Step Replacement Guide
Disassemble the Pod: Pull up firmly on the large black volume knob to break the glue holding it in place. Unscrew the nut and washer underneath.
Open the Housing: Remove the three small screws on the bottom of the pod to take off the plastic cover.
Remove the PCB: Lift the circuit board out of the base and unplug the white connector on the underside. If you never adjust volume and just want sound:
Extract the Old Potentiometer: Cut the legs of the old potentiometer to separate it from the board. Use a soldering iron to heat the remaining leg fragments and push them out.
Install the New Part: Align the new potentiometer's legs with the holes on the board. You may need to bend or trim the legs to ensure it sits level and close to the PCB.
Solder and Reassemble: Solder the new legs, ensuring no bridges between contacts. Plug the internal cable back in, screw the cover on, and replace the nut and washer.
Final Step: Apply a few drops of super glue to the center of the large volume knob and press it onto the new potentiometer shaft. Potential Bypassing Option
If the control pod is completely unsalvageable, some users choose to bypass the internal potentiometer entirely. By shorting or hard-wiring the signal path to "full volume," you can then control the output level directly from your computer or audio source digitally. If you'd like, I can help you:
Identify the exact potentiometer model number for your region. Find a pinout diagram for the proprietary 9-pin connector.
Walk through cleaning the existing part first to save on soldering.
Creative Gigaworks T3 2.1 Speakers Volume Control ... - iFixit
Creative Gigaworks T3 Volume Control Replacement: A Step-by-Step Guide
The Creative Gigaworks T3 is a popular and highly-regarded sound card known for its excellent audio quality and robust feature set. However, like any electronic device, it's not immune to wear and tear. One common issue that users may encounter is a faulty volume control. If you're experiencing difficulties with your T3's volume control, replacing it is a relatively straightforward process that can be accomplished with some basic DIY skills and the right tools. In this write-up, we'll walk you through the step-by-step process of replacing the volume control on your Creative Gigaworks T3.
Tools and Materials Needed:
Preparation:
Before you begin, ensure that you have a suitable workspace with good lighting and a clean, stable surface. Ground yourself by touching a metal object or wearing an anti-static wrist strap to prevent damage to the internal components.
Disassembling the T3:
Removing the Faulty Volume Control:
Installing the Replacement Volume Control:
Reassembling the T3:
Tips and Precautions:
Conclusion:
Replacing the volume control on your Creative Gigaworks T3 is a relatively straightforward process that requires some basic DIY skills and the right tools. By following this step-by-step guide, you should be able to successfully replace the faulty potentiometer and restore your T3 to its former glory. If you're experiencing issues with your T3's volume control, don't hesitate to try this repair – it may just breathe new life into your audio setup.
Replacing or repairing the volume control pod for the Creative GigaWorks T3
is a common task due to the system's proprietary 9-pin DIN connection. Because official replacements are often discontinued, you generally have three options: repairing the existing pod, finding a used original, or custom-building a bypass. www.ifixit.com 1. Repairing the Existing Control Pod
If the knob is "crackly" or unresponsive, the internal potentiometer is likely the culprit. Replacement Part
: You can often find compatible replacement potentiometers on electronics hobbyist sites or via guides on Basic Steps
Pull off the volume knob (it may be glued and require firm pressure).
Unscrew the nut, washer, and three small screws to remove the plastic cover. Desolder the old potentiometer and solder in a new one.
Clean the contacts with specialized electronics contact cleaner if the issue is just minor noise. www.ifixit.com 2. Finding a Replacement Pod Since Creative rarely stocks these on their official replacement parts page anymore, you'll need to check secondary markets. en.creative.com Where to Look
: Search for "Creative GigaWorks T3 volume control" or "Creative 9-pin volume pod" on sites like AliExpress Compatibility
: Be careful with "universal" 9-pin pods; many are wired differently for specific models like the Inspire series and may not work without modification. www.ebay.com 3. DIY Bypass / Custom Build
If the pod is completely lost or unrepairable, some users build a simple bypass box.
: The control pod typically handles power (on/off) and the stereo audio signal. Simple Fix
: If you only need it to stay "on," you can sometimes bypass the power switch with a jumper wire and control the volume entirely from your PC/Source. Custom Box
: Advanced users have built their own boxes using standard potentiometers and a toggle switch, though this requires knowing the specific pinout of the T3's 9-pin connector. www.reddit.com
Are you looking to buy a specific replacement part, or are you ready to try a manual repair?
Creative Gigaworks T3 2.1 Speakers Volume Control ... - iFixit
Replacing or repairing the volume control pod for the Creative GigaWorks T3 is a common task due to issues like volume fluctuation or crackling audio caused by a dirty or failing potentiometer. Since Creative has classified the T3 as "End of Service Life," DIY repair is often the only way to keep the system functional. Common Issues
Volume Fluctuation: Sound levels jump or drop unexpectedly when the dial is turned.
Crackling Audio: Static or popping sounds occur during volume adjustment, usually caused by dust or oxidation inside the potentiometer.
Sticky Dial: The control knob becomes difficult to turn smoothly. Required Tools
Small Phillips screwdriver (standard for electronic disassembly). Soldering iron and solder (required for full replacement). Cutting pliers (to remove the old component).
Contact cleaner (e.g., DeoxIT F5) for non-invasive cleaning. Super glue (to re-secure the knob upon reassembly). Replacement Procedure Disassemble the Pod: Unplug the volume control cable from the subwoofer.
Pull the volume knob up firmly to break the glue holding it in place.
Unscrew the nut and washer visible once the knob is removed. Now control volume via your computer or preamp
Remove the three small screws on the bottom to separate the plastic cover and expose the circuit board. Remove the Potentiometer:
Disconnect the white internal cable plug from the circuit board.
Cut the legs of the old potentiometer to separate it from the board.
Use a soldering iron to heat the remaining leg fragments and push them out of the board. Install the New Component:
Solder the new potentiometer in place. Some users recommend a 50k ohm potentiometer for similar Creative models.
Reassemble the pod in reverse order, using a small amount of glue to re-secure the volume knob. Alternative: Non-Invasive Cleaning
If the volume pod is simply "scratchy," you may not need a full replacement. Spraying electronic contact cleaner into the small openings of the potentiometer and rotating the dial back and forth several times can often clear oxidation and restore smooth function without soldering.
Watch these guides for visual demonstrations of volume control disassembly and cleaning: How to disassemble Creative Gigaworks T3 volume control ChaosDingo
Stop Crackling - Creative Volume/Bass Control Cleaning #0115 Make Or Repair
There are two levels of repair depending on your skills and parts availability.
Creative never sold the T3 volume control pod separately. Your options for a genuine replacement are:
Recommendation: Do not buy a used original pod. You will repeat the same failure. Instead, opt for replacing the internal potentiometer or building a bypass.
Replacing the volume control (potentiometer) on the Creative GigaWorks T3
is a common repair for issues like random volume fluctuations, scratchy audio, or the auto-off feature failing
. Because the control pod lacks visible screws, many users find disassembly difficult without a guide. Repair and Replacement Options Cleaning (First Choice):
Before replacing hardware, many experts recommend using a contact cleaner spray into the potentiometer's housing while rotating the knob to clear dust and debris. DIY Potentiometer Replacement:
If cleaning fails, you can desolder the old 5-pin potentiometer and replace it with a new one of the same resistance and dimensions. Full Pod Replacement:
In some regions, Creative HQ may offer entire brand-new volume controllers for a relatively low price. Bypassing the Control: For a "last resort" fix, some users choose to bypass the control pod
entirely by shorting the internal wires, though this forces you to control volume via your computer or audio source Step-by-Step Replacement Guide
If you choose to replace the internal potentiometer, follow these general steps based on iFixit's repair guides Remove the Knob:
Unplug the speakers. Pull the large volume knob upward firmly to break the factory glue securing it to the shaft. Disassemble the Pod:
Use an adjustable wrench to remove the nut and washer, then unscrew the three small Phillips screws on the base to remove the plastic cover. Desolder the Potentiometer:
Unplug the internal white cable. Cut the legs of the old potentiometer to separate it from the PCB, then use a soldering iron to remove the remaining leg fragments. Install the New Part:
Align and bend the legs of the new 5-pin potentiometer to match the board's contact points. Solder it firmly, ensuring no adjacent legs are bridged by solder. Reassemble and Test:
Reconnect the internal cable and screw the cover back on. Test for functionality before applying a few drops of super glue to reseat the volume knob. Required Tools Soldering Iron & Solder (100W dual USB-C or similar) Small Phillips #00 Screwdriver Cutting Pliers Adjustable Wrench E6000 Adhesive or Super Glue Do you need help identifying the exact model resistance value
for the replacement potentiometer to ensure compatibility with your unit?
Creative Gigaworks T3 2.1 Speakers Volume Control ... - iFixit
Here’s a draft you can use for a blog post, guide, or video description. I’ve written it in a clear, instructional tone suitable for DIYers or tech enthusiasts.
Title:
DIY Fix: Creative Gigaworks T3 Volume Control Replacement (Step-by-Step Guide)
Introduction
The Creative Gigaworks T3 is a legendary 2.1 speaker system, known for its powerful bass and crisp mids. But after years of use, one common failure point is the wired volume control pod – often suffering from scratchy sound, channel imbalance, or complete failure. Luckily, replacing it is a manageable DIY project.
What You’ll Need
Step 1 – Diagnose the Issue
Before replacing, confirm the problem is in the control pod, not the speakers or subwoofer. Try wiggling the volume knob or cable. If sound cuts in/out or changes channels, the pod is likely faulty.
Step 2 – Source a Replacement
Original Creative replacement pods are rare. Alternatives include:
Step 3 – Disassemble the Old Pod
Step 4 – Prepare the New Controller
If using a generic pod, you may need to match the pinout:
Step 5 – Test Before Final Assembly
Step 6 – Close Up & Enjoy
Once confirmed working, close the new pod’s casing, screw it shut, and enjoy your revived Gigaworks T3.
Pro Tip
If you can’t find a direct replacement, consider bypassing the pod entirely and using a passive in‑line volume control (e.g., from a headphone extension cable) between your source and the T3’s input.
Safety Reminder
Unplug all power before soldering or cutting wires. If you’re not confident with electronics, seek help from a repair shop.
Conclusion
Replacing the Creative Gigaworks T3 volume control pod is a satisfying fix that can extend the life of these great speakers. With basic tools and patience, you can bring them back to full functionality.
Would you like a shorter version for social media (e.g., Instagram caption or Reddit post) or a video script outline?
Here are a few options for the text, depending on where you intend to post it (e.g., a forum, a classified ad, or a guide).
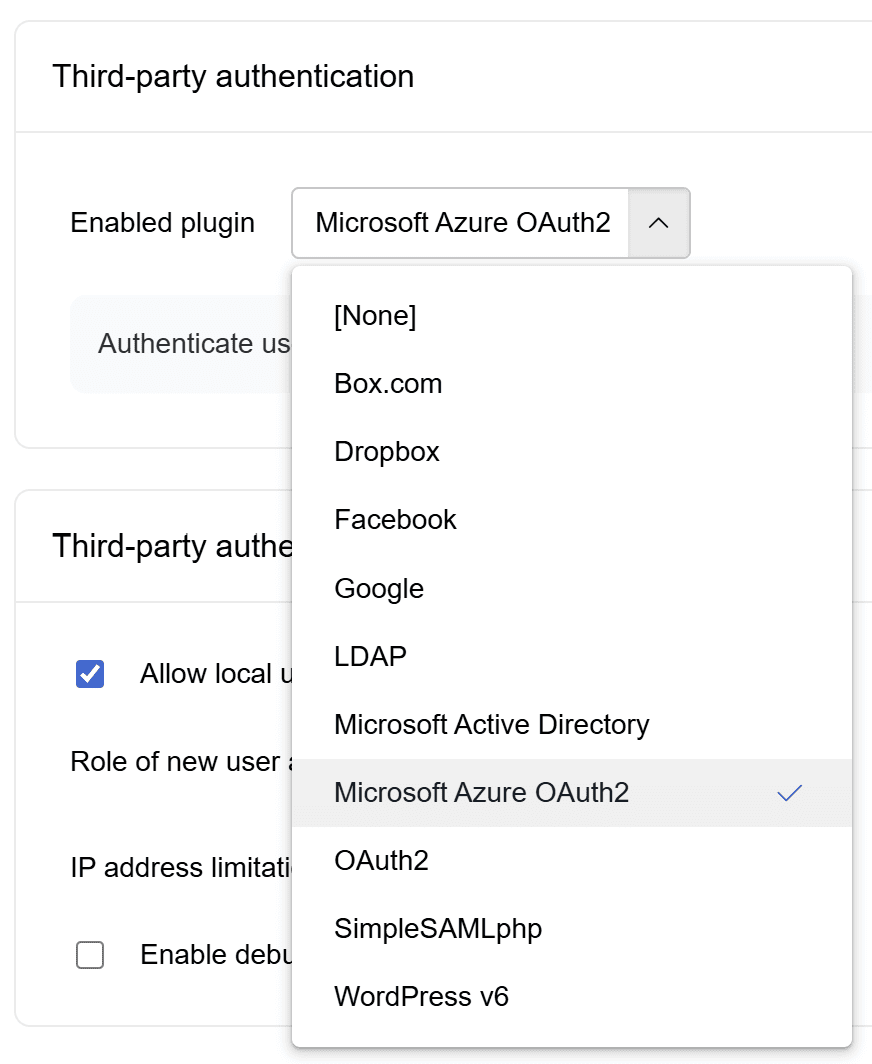
Save time and effort with user account administration.
Use one of the existing plugins, or you can even write your own.
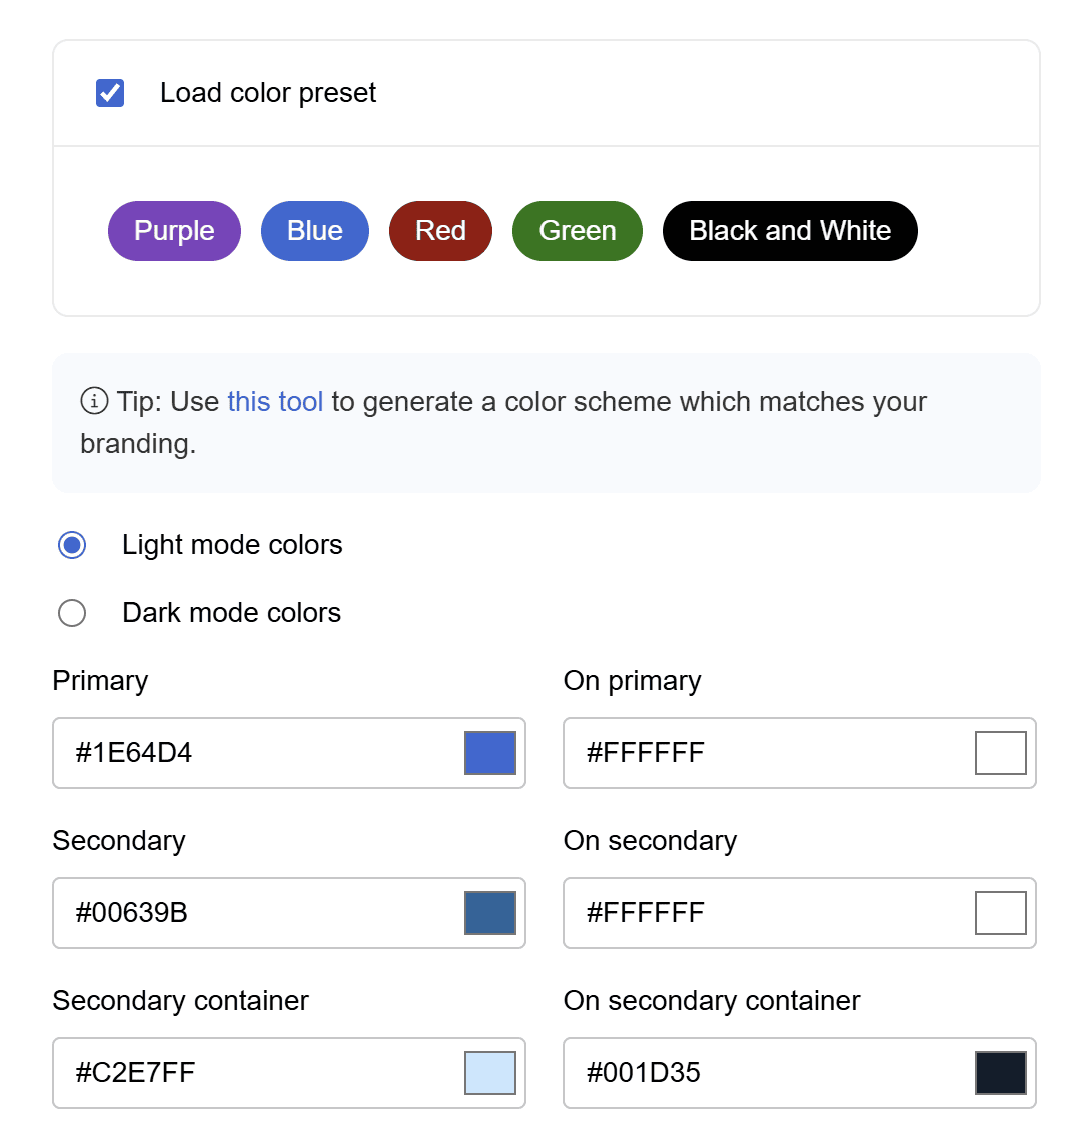
Select a pre-existing color theme or create your own personalized theme to match
your brand.
Every aspect of your FileRun interface can be tailored to your needs:
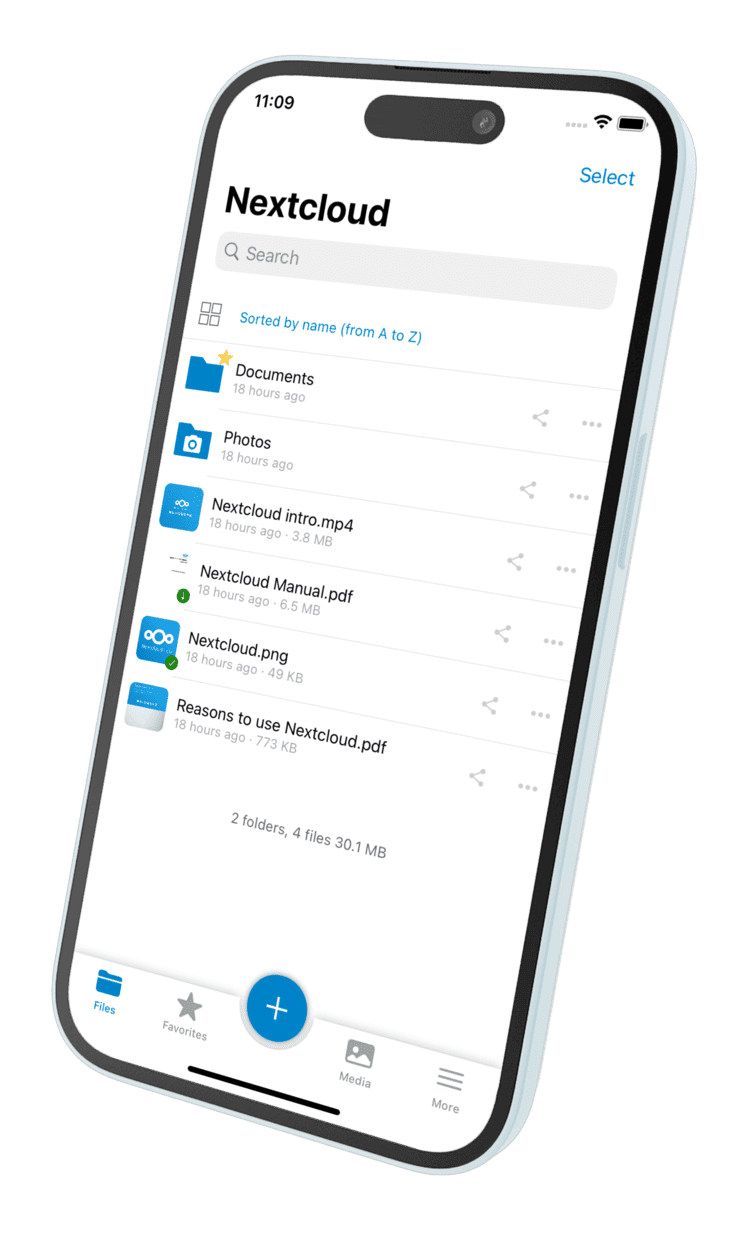
Easily publish your own desktop and mobile apps, under your name, your branding, your control.
Compatible open-source apps are already available for every platform, making custom development a breeze.
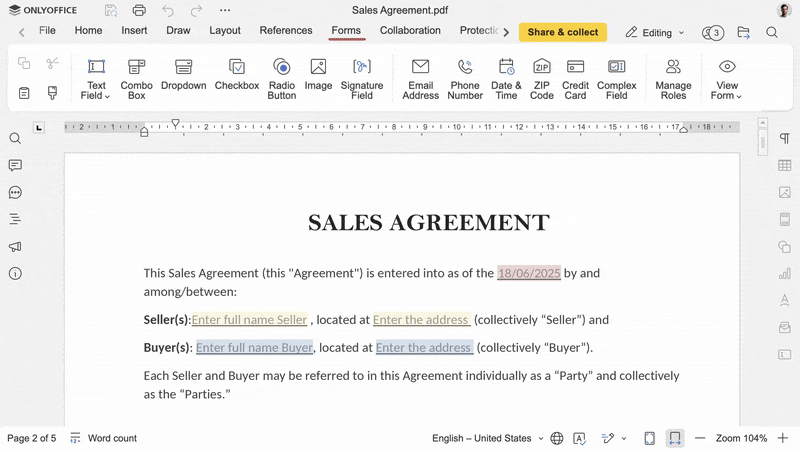
Read and write documents, with the tool of your choice:
In your private network: